
Fantabulistic Z-Fold Card Tutorial
The awesomeness of the Stampin’ Up Summer Shadows Dies doesn’t end! Here’s another stunner you can make with this die set. These are only available free during Sale-a-bration (ends September 30). Even though the dies coordinate with the Shaded Summer stamp set (annual catalog) you don’t need the stamp set to create spectacular projects. These dies stand out all by themselves. The words are from the In Your Words Sale-a-bration host set. I have more details and easy to follow, printable instructions for the Fantabulistic Z-Fold Card Tutorial below.

OMBRE BACKGROUNDS
Want to learn more cool techniques with the Summer Shadows Dies? Check out my Ombre Background Fun Fold class.
PHOTOS

Z Folds are an easy technique and they add a lot of fun to your designs. If you aren’t sure how to make a Z fold card, I have instructions below and a video here of a previous Z-Fold project. They fit in a standard medium sized envelope.

Here’s a peak at the card unfolded. If you wanted to leave more space for writing at a piece of Basic White instead of the 2nd striped designer paper in the middle fold. For nice crisp score lines, use the Simply Scored tool.

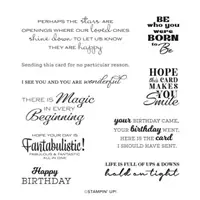
The greeting is as fun as the card. They come from the In Your Words Saleabration Host Stamp Set. The card design is versatile and can be used for many occasions. Simply change the greeting and it can be birthday, thank you, sympathy, anniversary/wedding, congratulations and so much more.

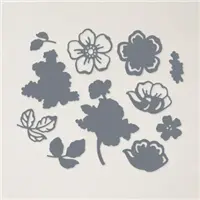
I’m loving these 2 step layering dies. The black over bright colors like the Mango Melody and Polished Pink is stunning.
HOW TO MAKE THIS CARD
CUTS:
- Polished Pink Card Base: 11″ x 4-1/4″
- Scored at 2-3/4″ & 5-1/2″
- Basic Black: (2) 2-1/2″ x 4″
- Basic Black: 5-1/4″ x 4″
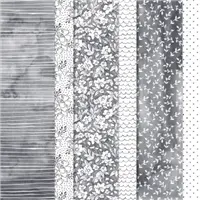
- Designer Paper (Stripes): (2) 2-1/4″ x 3-3/4″
- Designer Paper (Dots): 5″ x 3-3/4″
INSTRUCTIONS:
- Using the Stampin’ Cut & Emboss Machine cut the following pieces:
- Basic White: 2 Tasteful Labels Dies.
- Polished Pink: 2 smaller flowers and 1 solid larger flower.
- Mango Melody: 1 solid flower.
- Granny Apple Green: Solid leaves.
- Basic Black with Adhesive Sheet attached: 1 of each larger outline flowers and 1 smaller solid flower.
- Stamp the words from the In Your Words Dies on one of the labels.
- Assemble the 2 step die flowers together. The black outlines should be self adhesive.
- Assemble the card pieces using Seal Adhesive.
- Attach the 2 larger flowers, leaves and the label to the card base using Black Stampin’ Dimensionals.
- Attach In Color Gems using Take Your Pick Tool.

Download the free printable instructions for how to make this card. A full supply list is included with clickable links.
PIN IT!
Want to save this card idea? Pin it to your pinterest board.

Have you tried this design? I love to see your creations! Be sure to share them on #shareyourcrafts post every Saturday on my Facebook Page.


I love Z-fold cards. Now I know just how I’m going to make my next card.
Awesome!
Love a Z fold and this one using those new dies is great! Thanks for sharing
You’re welcome. Thanks for watching!
I love the z Fold card you made and the DSP utilized for this card! Love it!
So glad you like it!
#stampitcobtest I can’t wait to make this card! I have the colors and DSP just need the dies!
You’re almost there – get them while Sale-a-bration is still going on!