
Seasonal Set of Notecards Tutorial
Fun and easy Seasonal Set of Notecards Tutorial created with the Stampin’ Up Festive & Bright Bundle. Very easy to make using some Very Vanilla Card Stock and the Stampin’ Blends Markers. These fit in a Very Vanilla Medium sized envelope. I put them in an Acetate Card Box so they would make a great gift. You could make them all for one holiday or occasion, or give a variety.
I have more details and easy to follow, printable instructions for this set below.

HALLOWEEN TREAT SETS
Want to learn more fun projects with the Festive & Bright bundle? Check out my Halloween Treat Sets class.
PHOTOS

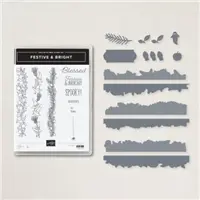
I’ve been enjoying the Festive and Bright bundle and all of it’s versatility. The edglit stamps and matching dies have so many possibilities.

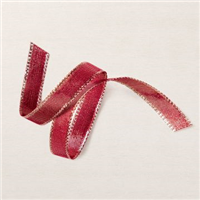
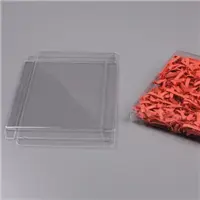
The Acetate Card Boxes are available in my online store. They make giving a set of cards look so professional and nice. I keep these simple by wrapping some Cherry Cobbler Metallic ribbon around it.

I love how the cut edge really takes these notecards to another level.

For the Halloween card design I combined the Word Wishes dies. The ghosts are from the Festive Finishes dies that are part of the bundle. I put some Wink of Stella on the ghosts for some added shimmer.

For the fall and Christmas cards I used the Thinking Thanks & Peace stamp set for the words.

HOW TO MAKE THIS CARD
CUTS:
- Very Vanilla Cardstock: 8 ½: x 5 ½”
- score @ 4 ¼” and fold
- Scraps of Real Red, Rich Razzleberry & Granny Apple Green
INSTRUCTIONS:
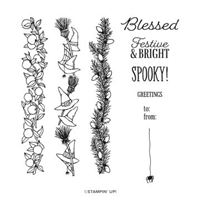
- Stamp the image in Memento Black at the bottom edge of each card base.
- Stamp words on each card base.
- Color the images with Stampin’ Blends markers:
- Peace on Earth: Bermuda Bay, Blackberry Bliss, Granny Apple Green, Daffodil Delight and Real Red.
- Halloween: Blackberry Bliss, Granny Apple Green & Basic Black.
- Sending Thanks: Real Red & Granny Apple Green.
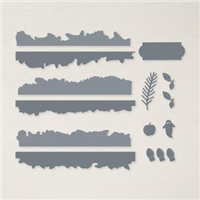
- Cut the bottom edge of each note card with the coordinating edgelit. Tip: They are numbered by image:
- #1 is the hats edgelit
- #2 is the holiday lights
- #3 is apples
- Attach adhesive sheets to the back of Granny Apple Green, Real Red and Rich Razzleberry scraps and cut
- “Halloween” from the Word Wishes dies
- Apples from Festive Finishes dies
- Ghosts from Festive Finishes dies
- Optional apply Wink of Stella glimmer pen to the die cut pieces for shimmer.
- Attach the die cut pieces.
- Assemble acetate box and tie ribbon around the box.

Download the free printable instructions for how to make this card. A full supply list is included with clickable links.
PIN IT!
Want to save this card idea? Pin it to your pinterest board.

Have you tried this design? I love to see your creations! Be sure to share them on #shareyourcrafts post every Saturday on my Facebook Page.


Theses cards are very pretty. nice idea. Think I will make some. Thanks.
Fabulous idea and
so fun! #stampitcontest
Carla from Arizona
Thanks!