Archives for August 2013

CARD: Cool Pop ‘n Cuts Gift Card Holder

pop n cuts gift card holder

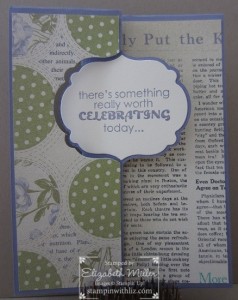
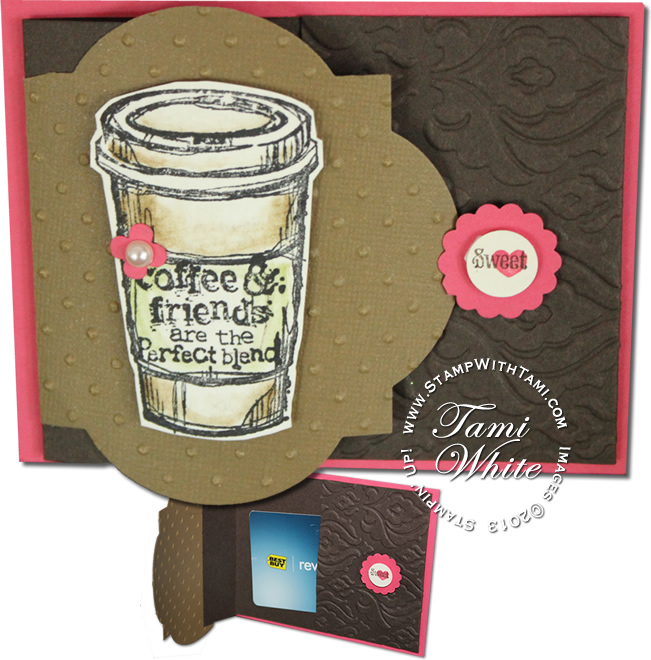
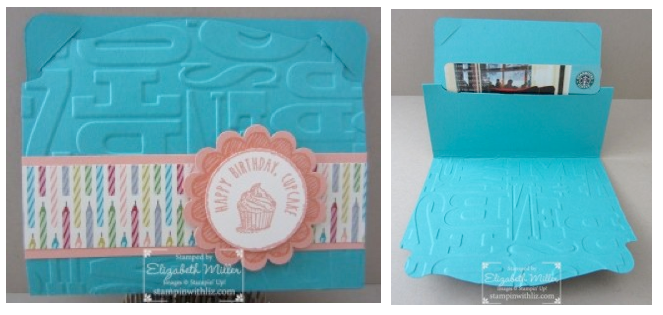
Today's super cool project featuring the Pop n' Cuts card base as a gift card holder is from guest blogger, Liz Miller:

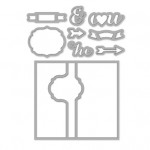
Do you like to discover other alternatives for the products that you already have? If you answered yes, then I have a treat for you. I love the Pop ‘n Cuts Card Base die, but I always used it with the Dress Form Pop ‘n Cuts. So I just removed the Dress Form insert and figured out how to fold the card stock to create this stinkin’ cute gift card holder. Now who wouldn’t want to receive this awesome little treat?

~ Liz Miller
Stampin' with Liz

CARDS: Mega-Blast of Flip Cards from Shelli

At Stampin’ Up!’s Annual convention this year, Shelli Gardner demonstrator a ton of the most AMAZING flip / swing cards made with our new thinlits dies. My camera couldn’t get them fast enough lol, and thankfully Shelli posted pictures of them on her blog so we can see them up… Read More

VIDEO: Simply Sketched Double Impressions WOW

simply sketched-clubAfter lots of practice, and coaching (from you guys) I've finally learned how to say "papillon"! Wahooo! Be sure to check out my latest Bloopers for a few laughs at how badly I've been botching this word. No matter how you say it, this card is gorgeous! A swap from Leonie Shroder (all the way from Australia!). You'll love this "double impressions" technique for fabulous texture.

I originally created this for stamp club last month, and although I don't often post my club projects publicly, I wanted to share this one to give you a taste of what we do. If you are one who likes written directions, and enjoy free stamps, and exclusive projects, you'll want to check it out (click here).

Leonie used the Gifts of Kindness stamp set for the words on hers, in the video I used a greeting that came with the Simply sketched hostess set.

A little something from Shelli

flowers from Shelli Gardner-stmapin upWhat a whirlwind day yesterday was! I was so touched by everyone's support for making the Million Dollar Milestone, you couldn't wipe the smile off my face. It could end here and it would all be worth it, but the day gets even more exciting with a personal phone call from Shelli Gardner (CEO and Co-Founder of Stampin' Up!). She was calling to personally say congratulations, and we made some plans for an upcoming "date" we have together to celebrate. I LOVE this woman and this company. Wow!

Then the florist calls and says they have a delivery! I think ... hmmmmm...maybe one of my parents?? They are very sweet like that. I was not expecting this ginormous, gorgeous, bouquet of the most beautiful flowers that fills my kitchen!!! And of course, I can't wait to see who would've sent them but as I remove the envelope, I noticed immediately that it was hand stamped. Not that my parents don't stamp, heck my mom is a demo but I'm pretty sure she doesn't have the envelope liner die yet, so now my curiosity is crazier than a cat. I rip open then envelope to find this amazing hand written card from Shelli Gardner herself. Since I'm on the other side of the country from Shelli, and I had spoken to her a few hours earlier, knew getting this special card to the florist was not small task. I will cherish this and all that the day has brought forever.

Ok, enough mushy stuff from me lol. I just KNOW you're dying to see this gorgeous "Shelli" card up close. It's a beauty. I'll post the supplies below in case you want to "CASE".

card from shelli-stampin up

THANKS A MILLION!

thanks a million-tami white-stampin up

$1 Million in personal sales!

WE DID IT!!! As of yesterday (Aug 26, 2013) in the afternoon, at approximately 2pm est (but who's counting lol), I hit ONE MILLION DOLLARS in sales! Maybe the biggest milestone I've ever hit in my lifetime!! Becoming the 4th person in the 25 year history of Stampin' Up to reach this milestone, following the legendary: Mary Polcin, Lisa Fast and Joyce Ferraco...I am humbled and honored and simply speachless.

I can't even describe the feelings and emotions of finally making this huge milestone. It's overwhelming, and even more with so many cheerleaders...the excitement of all who reached out in these final moments as we were reaching the "finish line" via emails, phone calls, texts, comments, etc. I am so touched by your support!

$1Mil in stamps is A LOT of stamps, it doesn't happen "by accident" or "overnight", it's years of dedication, loving what I do and I'll admit sometimes it's even "hard" work. But it's so much more than me, this milestone is dedicated to you, my customers. Each and every one of you who have ever placed a Stampin Up order with me over the past 10 years are a part of this excitement. And especially to my stamp club members. My clubbers know they hold a special place in my heart, as they are the back bone of my business for so many years. Some have been with me since the beginning. You've become good friends, and I love you all so much. YOU MADE THIS!

So who was the $1 Million Customer?

CONGRATS TO RACHAEL RIFE!!! And thank you to EVERYONE who placed orders during the final stretch this weekend, it was amazing. Not only did I hit the milestone, we hit it 2 weeks early thanks to you!! I was originally shooting for September 11, my 10 year anniversary with Stampin' Up.

Because we were counting down the sales in the end, I was able to pin point EXACTLY which order was the order that put me over the million...hence making it the "Million $ Customer" lol! That customer is Rachael, and I'm giving her a $150 Stamping Up shopping spree for being the lucky one in a million orders!!!

thank you

MDS: Rev Up the Fun & Kickin it Old School plus FREE

2013-08-27-mds

It's another great week for new downloads-pocket cards, a retro school kit, a free desktop wallpaper, a traveling gift tag, and four downloads from traditional products. Be sure to check them out and make sure your customers get in on the fun too. (PDF)

learn more about mds my digital studio

NEWS: So close you can taste it – $1 Million Update

mixed medley - cherleneOMG!! I'm so stinkin' excited!! THANKS to all of you who've supported me (now and through the years) and especially over this weekend...I am INCHES away from the BIG ONE!! ONE MILLION DOLLARS in personal sales. That's a lot of stamps, and a lot of awesome friends and customers through the years. This is such an exciting time. Click here to learn more.


CARD:

Today's card is from my downline, Charlene Luks, at least I'm pretty sure it was Charlene's. This was a gorgeous swap from our demonstrator meeting last week, only her name wasn't on the back to confirm and in the swapping excitement, I forgot whose was whose. I'm guessing, but let this be a lesson, always put your name on your swaps so you can get proper credit hahaha!

Charlene used the Modern Medley DSP the square and postage stamp punches and the Needlepoint embossing golder. Simple, yet very effective.

CARD: Flip flop birthday card

Here's a cool card using the new Labels Framelits dies from Liz Miller of Stampin' with Liz.

They’ve been called flip cards, flip flop cards, swing cards, and more-but they have always been a bit tricky to create. Not anymore! Stampin’ Up!’s amazing new Thinlits Card Dies cut and score to create a card that flips in just one super easy step! Lets put our hands up in the air and shoot ~ WOOHOO!!!!

Here is my creation for an upcoming birthday, I kept it very simple to highlight the colors and just wanting to keep the focus on the swing action! ~ Liz Miller

1934-238x300

Sorry I forgot to take a photo of it before I wrote inside of it! Silly me!


UPDATE: Million Dollar Baby!

tami and babyEver had one of those times in your life when it feels like a dark menacing cloud is following you around and dropping big storms, one right after another. The past month has been one of those times for me, and I'm struggling with it but it's had some moments where the sunshine peaks through. For example, I had a little "baby therapy" over the weekend in the form of finally getting to meet and hold my 3 month old nephew for the very first time! It's been killing me that I live in Massachusetts, and my sister and her family are in Alabama. Here's a picture of us, I miss him already, our time together was too short.

I'm on the edge of shaking this cloud of bad fortune for good...and letting the sun shine through with another exciting moment. I'm about to hit a HUGE milestone in my Stampin' Up career. So close I can taste it, but I need your help to get there. I'm "inches" away from hitting ONE MILLION DOLLARS in personal sales!!!!!!

In Stampin' Up!'s 25 year history, only 3 legendary people have ever hit this milestone. My 10 year anniversary is September 11, and I'm dreaming of becoming the 4th person in SU History to hit this mark on or before my 10 year anniversary.

I can't thank you all enough for all of your support over the past 10 years, even if you purchased the smallest of orders from me...you were a part of making this happen. Stay tuned.


VIDEO: Tami’s Bloopers, Blunders & Stamp Fails of 2013

stampwithtami-bloopers

Ever wonder what goes on "behind the scenes" of some of these videos? Today I'm sharing what not to do lol. These are some of those "not so pretty" moments that the video camera picked up that you can't help but giggle. What good are we if we can't laugh at our mistakes and learn from them.

If you are interested in more information on any of the projects featured in my blooper reel, click on the thumbnail below for the full featured videos. A few of the blooper reels from today's mix are exclusive to my stamp club, if you are interested in my information on joining my stamp club, click here.

VIDEO: Festive Flurry Gift Tags from the Holiday Catalog

festive flurry gift tags stampinup

Check out the video on how to make these sweet tags found on page 12 & 13 of the Stampin Up Holiday Catalog. They are made with the Festive Flurry stamp set and coordinating Festive Flurry Framelits. A great feature about these tags is that you can make them as simple or as elaborate up as you want. With all the different size snowflakes, you can keep layering until you get they look you're after - and really, they look amazing no matter what. Send these as winter greetings, dress-up your packages, or even trim your tree.

Festive Flurry Wood-Mount Stamp Set
Item: 131778

Festive Flurry Clear-Mount Stamp Set
Item: 131781

$39.95
Festive Flurry Framelits Dies
Item: 132193
$24.95

Festive Flurry Wood-Mount Bundle
Item: 133284

Festive Flurry Clear-Mount Bundle
Item: 133285

$54.95

TIPS AND INSTRUCTIONS

  • To get a dimensional look, stamp your snowflake and cut it out with the coordinating framelit.
  • Then score the snowflake image from tip to tip, you can use the Simply Scored Tool to get help you get straight lines.
  • Fold the snowflake in an accordion pattern.
  • Cut a circle out of the center, and then squish the snowflake together.
  • Adhere the folds of the snowflakes using hot glue.

VIDEO

MDS Weekly Downloads – Camping and Holidays

2013-08-20 mds downloads

Some fall and camping fun in this week's MDS (My Digital Studio) downloads - weekly downloads. (PDF)

learn more about mds my digital studio

VIDEO: Halloween Banner Kit from the Holiday Catalog

halloween banner kits

Need something spooky to spice up your Halloween décor?

Stampin' Up! is here to help you spook the halls. Check out our adorable new Build a Banner Simply Created Kit and the Halloween Banner Simply Created Accessory Kit! You can design your own like we did in the Holiday catalog or follow the simple instructions to make the one you see here!

Build a Banner Simply Created Kit

You'll need the Build a Banner Simply Created Kit #133507 which comes with eighteen blank canvas paper pennants, six each of three designs, nine feet of jute twine to assemble the banner, pattern stencils, a full alphabet of stencils and a color spritzer. If you find that you need additional pennants for other projects you have in mind, be sure to check out our refill kit.

Halloween Banner Simply Created Accessory Kit
The Halloween Banner Simply Created Accessory Kit #132698 comes with some really fun exclusive Stampin' Up! accessories. There are pre-scored rosettes, some beautiful ribbon -- including Pumpkin Pie seam binding. And we just love the super cute, exclusive, black vintage faceted buttons.
To get started, we'd like to share with you a couple of tips to help you be successful.

TIPS AND INSTRUCTIONS

  • First, you may want to put a little bit of adhesive on the back of your stencil so that it's easier to keep it in place. For this particular project, we have chosen to sponge the patterns and letters using a dauber, Pumpkin Pie, Summer Starfruit, and Basic Black ink.
  • To make the rosette take the pre-cut and scored strips and fold them back and forth, attach the ends together, and now you can push the center down onto some hot glue to hold it in place.
  • Now all of the other kit accessories can be added, we'll string the banner together with the jute, and add bits of ribbon for the finishing touch.

We love how cute it is and how simple it was to assemble! Have fun making your Halloween even spookier with this simply amazing banner kit!

VIDEO

CARD: Come to My Party – Invitation

stylin girl-sandy barreraHow stinkin' cute is this party invite for a little girl's birthday? "Come to my Party" Ballerina from the Stylin' Girl stamp set. It's even more adorable in person, where is sparkles and shines. The dancing image is colored with the Dazzling Details silver glitter pen and pink pirouette (pun intended) stampin write marker. Created by Sandy Barrera.

CARD: Fabulous Simply Sketched Wow

simply sketched-rose ann marrThis is a fabulous WOW card using the Simply Sketched Hostess stamp set in the 2013-14 Stampin Up Catalog, and the Million & One stamp set for the words. "Fabulous is what you are" - Love, love, love!!

The flowers were colored with blushing bride & Pink pirouette ink pad refills, along with the strawberry slush and old olive stampin write markers. Created by Rose Ann Marr

CARD: Chalk Talk Core-dinations

chalk talk-debbie roweIt's my opinion that no matter what you make with the Chalk Talk stamp set and framelits, you just can't go wrong. Everything comes out beautiful. Here's another stunning example. I love Cantaloupe Crisp and Espresso combination, especially with the core'dinations card stock sanded. Very vintage and striking. The punched out circles from the Itty Bitty punch pack add a unique form of interest to the card. Created by Debbie Rowe.

VIDEO: Hula Girl Hawaiian Card & Bonus Pineapple

hula girl cindy baughman OMG!! Huge Stinkin' Cute Alert...check out this Hawaiian Hula Girl card from my friend Cindy Baughman! I love this, it's so fun and surprisingly easy to make. Check out my video below for details. How adorable is this coconut bra, reminds me of both Hawaii and Jimmy Buffet concerts hahaha. I've also included supplies for a bonus Pineapple Card, also designed by Cindy.

I especially love this theme because Stampin Up just announced that this years incentive trip available for all demonstrators to earn is ... HAWAII!!! WAHOOO!!! We have from now thru June 1, 2014 to earn it, and the trip will take place in the spring of 2015. If your interested in learning more check out my Become a Demonstrator page, or email me.


pineapple card

INSPIRATION SHEET

hula girl and pineapple card video sheet

Inspiration Sheet
Includes all measurements and supplies
Hula Girl & Pineapple Cards pdf

CARD: Off the Grid Flowers of Sympathy

a dozen thoughts-debbie wareToday's card is simply beautiful. I love the creative use for "Off the Grid" stamp set background, the words are from the "A Dozen Thoughts" set. The flowers are what really stand out, they are a mix from the Itty Bitty shapes punch pack and the Floral Fusion sizzlet. They are layered on the Little Leaves sizzlit and the edges are colored using an aqua painter and ink pad. Created by Debbie Ware.

NEW: Clear Photopolymer Stamp Set – Another Thank You

stampin up - another thank you stamp set

We have a brand-new photopolymer stamp set available. Another Thank You (item 133454) is an exclusive, versatile set for any occasion that calls for a thank you.

stampwithtami- another thank you

Check out all of our Clear Photopolymer stamp sets & the online class. Available in my online store thru March 31, 2014

CARD: Rev Up the Fun Pink Sports car

rev up the fun-anjanette potterWho says race cars are "boys toys" only? Girls can have some racing fun too! I love it! A hot pink sports car...wahooo! Featuring Strawberry slush and Bermuda Bay, a very pretty combination. It's ok to call a sports car card pretty right? lol. This card was created by Anjanette Potter.

CARD: Perfect Blend Coffee Cups

perfect blend-stacey reddiesHere's another fun card using the Perfect Blend stamp set, or as I call it, the Starbucks stamp set. The coffee/tea "to go" cups and so cute. In yesterday's video I featured this stamp set in a stinkin' cute gift card. This card also uses the Core'dinations card stock and sanding system for it's cool background. Created by Stacey Reddies.

MDS: Autumn-Inspired Downloads

2013-08-13 mds downlaods

Fall is right around the corner, so we're gearing up with new autumn-inspired downloads. (PDF)

  • Create the perfect first day of school photo shoot with the My First Day Printables.
  • Dress your projects in layers with the Sweater Weather Designer Series Paper.
  • Find all things creepy, crawly, and cackling in the Witches' Brew Designer Series Paper, Halloween Happiness Stamp Brush, and the Halloween Bash Stamp Brush Set.
  • Use the Tags 4 You Stamp Brush Set and the coordinating Label Bracket Punch to embellish any gift with ease for the next four holidays. (Get it? Tags 4 You . . . for four holidays.)
  • And finally, make summer last a little longer with the tropical Paradise Found Photobook.

VIDEO: Perfect Blend Starbucks Gift Card Holder

perfect blend-stampinup3Today's video is an awesome gift card holder using the Perfect Blend stamp set, which I've nicknamed the Starbucks stamp set lol. "Coffee & Friends are the Perfect Blend" and it's perfect for both a Starbucks/Dunkin Donuts gift card, but as you can see from my example, you can use for any gift card.

This is a great way to dress up a gift card. I also love the Coordinations card stock accent piece created from the window framelits. Inspired by Dana Wurster.

INSPIRATION SHEET

starbucks gift card holder-stampinup PM

Inspiration Sheet
Includes all measurements and supplies
Starbucks Gift Card Holder pdf

Haunted House Gift Boxes from the “Best of Halloween”

trick-or-treat-box

This stinkin' cool project comes from Stampin Up concept artist Christina N. I love it!! The haunted house image in the Best of Halloween is one of my all time favorite images!

Every year at Halloween I love to give all of my nieces and nephews a treat, and it’s always wrapped up especially for them. Since the August “Best of” stamp set is “Best of Halloween,” it’s the perfect opportunity for me to get started early this year. You can read more about our “Best of” stamp sets here

I love that there are three main images, a border, and a greeting in the stamp set. Since the main images are about the same size, it was easy to come up with a design that worked for all of them.

I used the new Decorative Window Gift Boxes since they are small and all of my nieces and nephews are still very little. I didn’t think they needed much more candy than these hold!

Christina N.
Concept Artist

VIDEO: Christmas Banner Simply Created Accessory Kit

stampin up christmas banner kit

We are featuring our new Build A Banner Simply Created Kit and the Christmas Banner Simply Created Accessory Kit , which is fully customizable! These are featured in the new 2013 Holiday Catalog. You can create any holiday greeting you want. For directions on how to make this beautiful banner, check out the video below.

Christmas Banner Simply Created Accessory Kit
Item: 132697

  • four pre-scored
  • precut rosettes
  • three glittered die-cut accents
  • two 18" pieces of Silver 1/8" Ribbon
  • two 18" pieces of exclusive Bermuda Bay/Pool Party 1-1/4" Two-Toned Ribbon
  • 36" of Whisper White 3/8" Taffeta Ribbon
  • five Vintage Faceted Designer Buttons
  • ten Large Rhinestones.

Build A Banner Simply Created Kit
Item: 133507

  • eighteen 5" x 7" blank canvas paper pennants, six each of three different designs
  • 9' of jute twine
  • alphabet and image stencils
  • Stampin' Spritzer.

DIRECTIONS & TIPS

Use the pattern stencils and your Stampin' Spritzer to create the patterns on your pennants. Be sure to plan your design out before you begin spritzing.

  • Fill your Stampin' Spritzer with your desired color of reinker and rubbing alcohol or water (we recommend rubbing alcohol because it will dry faster).
  • You can adjust the color saturation in your spritzer to create different looks. If you want a darker color use more reinker and less alcohol. If you want a lighter color use less reinker and more alcohol.
  • To spritz your pennants, lay your pattern down on your pennant.
  • Spray with your Spritzer until you have the desired saturation.
  • The spritzing will pool on the stencil a little so be sure to carefully lift your stencils off to prevent any accidents with the reinker.
  • To add letters to your pennants, lay down your shield stencil and your desired alphabet stencil and spritz a coordinating color.

VIDEO: