
Today is my Stamp It Demonstrator Group’s Valentine’s Day themed blog hop! Be sure to take the blog hop below for more awesome inspiration and enter to win our giveaway!
A Fun Fold That’s Sleek, Interactive, and Full of Heart
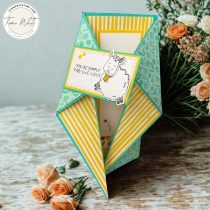
Today I’m excited to share a brand-new Slimline Lapel Card Fun Fold—and this one is extra special because it kicks off an entire series of Slimline Lapel cards I’ve designed just for you. Featuring the Stampin’ Up! Made with Love Suite.

This unique fold has flaps that open like a jacket, revealing a surprise inside that truly wows when opened. Best of all, it looks impressive while still being very doable, even if you’re newer to card making.

This unique fold has flaps that open like a jacket, revealing a surprise inside that truly wows when opened. Best of all, it looks impressive while still being very doable, even if you’re newer to card making.

For this first design, I used the beautiful Stampin’ Up! Made with Love Suite, which is packed with soft colors, elegant patterns, and heartfelt details that are perfect for Valentine’s Day—and so many other occasions. This style of card works wonderfully for love, anniversaries, weddings, thinking-of-you, or even friendship cards just by swapping the sentiment.

Why You’ll Love the Slimline Lapel Fold
One of the reasons I adore this fold is because it gives you big impact without complicated steps. Slimline cards offer extra space to showcase patterned paper, layers, and focal images, and the lapel design adds that interactive element card recipients love. Additionally, this fold fits perfectly into a standard slimline envelope, which makes it practical for mailing or gifting.

In my video class, I walk you through how the fold comes together and share tips for layering, pattern placement, and getting everything lined up cleanly. While the detailed measurements and steps are included in the downloadable PDF, this post is here to give you inspiration and confidence before you dive in.
It’s Blog Hop Time! 🎉

Blog Hop Giveaway


Card Instructions (Quick Overview)
For this Slimline Lapel Card, you’ll start with a slimline card base, score and fold the front panels to create the lapel effect, then layer Designer Series Paper to highlight the fold. The focal images and sentiment are added last to bring the whole design together.
👉 The full step-by-step instructions, printable PDF, and complete video class are linked here, making it easy to craft along at your own pace.
Shop the Supplies
All of the Stampin’ Up! products I used are available in my online store. If you’re looking for a Stampin’ Up! Demonstrator, I’d love to help you with your paper crafting journey!

What’s Coming Next
This Slimline Lapel Card is just the beginning! Over the next few weeks, I’ll be sharing more designs, variations, and ideas using this same fold—perfect if you love learning one technique and stretching it in multiple ways.


Sneak Peek Alert 👀
If you watch the video, you’ll also get a first look at the brand-new Stampin’ Up! Stampin’ Positioner Tool 👀 I share a quick sneak peek and how it helps with precise stamping and alignment. Then be sure to come back tomorrow for the full reveal and my complete March Online Exclusives sneak peeks—you won’t want to miss what’s coming!

Ready to Dive Into Card Making?
If you’re new to card making or just starting your Stampin’ Up! journey, here are a few great ways to get involved:
💡 Getting Started with Paper Crafting – A beginner-friendly guide to essential supplies and first projects.
🎥 Video Tutorial Gallery– Learn fun folds, techniques, and tips at your own pace.
🌟 Join My VIP Club– Enjoy exclusive classes, discounts, rewards, and crafting perks every month!
Closing
Thank you so much for stopping by and crafting with me today. I hope this Slimline Lapel Card sparks your creativity and gives you the confidence to try something new. Be sure to hop along, leave comments for the giveaway, and come back soon—there’s so much more inspiration on the way.
Happy stamping! 💕
Tami


Very pretty and unique design!
I’m glad you iike it, Barb!
Cute, cute, cute!! Will try this one myself!
Definitely!
Nice design
Thank you!
#stampitcontest
I came back to watch the replay, and as always, your project was amazing. Love the Lapel Fold! Gorgeous cards, Tami…what a fun series!!
I’m so glad you like it and you see how many different looks you can get with it.
Love your card design! Thanks so much for the free tutorial!
You are so welcome. I”m glad you like the design. I love it too!
#stampitcontest Wowser! Amazing design! Thanks for sharing!
Thanks, Sharon and thanks for watching.
What a fun fold! Love it! #stampitcontest
Thanks and thank you for watching!
What a great card and fun fold! Can’t wait to try it. Thanks for sharing your inspiration!
#stampitcontes Love the fold.
Tami so stinking cute thanks for the pdf cannot wait to try this fun fold!
Alyse
#stampitcontest
I love all your unique cards. I will definitely give this one a try!
Have fun!
Amazing slimline card using Made With Love!
Great card, I love it
Thank you!
Tami, love the card but am having aging a very difficult time finding the printable pdf. Please help
It’s on my blog under “blog hop and video”. Keep scrolling way down past the video and you’ll see the link to the PDF.