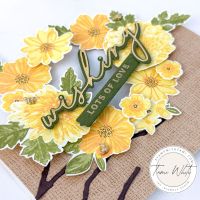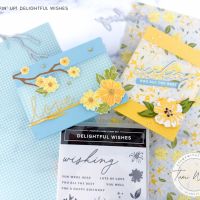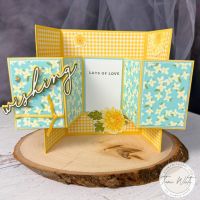
Handmade Card Tutorial: Daffodil Delight Circle Wreath Card
Hello, my crafty friends!
Today, I’m thrilled to share a beautiful handmade card tutorial featuring the new Stampin’ Up! Floral Delights Designer Paper and the oh-so-lovely Daffodil Wishes Bundle. This card came to life as part of a Daffodil Delight color-themed Insta Hop, and let me tell you—it’s a showstopper! Whether you’re a seasoned card maker or just starting your paper crafting journey, this tutorial is designed to inspire creativity and bring joy to your card-making process.

Inspiration Behind the Design
When I first saw the Floral Delights Designer Paper, I knew it was destined for something special. The vibrant, detailed florals practically begged to be cut out and used as a centerpiece. For this card, I chose to create a Circle Wreath Fold—a fun, dimensional design that highlights the beauty of this paper.

The Daffodil Wishes Bundle was the perfect pairing for this project. I love how the script “wishing” die (or stamp) can be combined with versatile phrases like “lots of love.” It makes this card ideal for so many occasions: sympathy, birthdays, anniversaries, or just because. And let’s not forget the adorable Tiny Bee Trinkets—the perfect little touch to bring the whole design together.

About the Products
This card features items from the upcoming Floral Delights Suite, launching in the 2025 Stampin’ Up! January-April Mini Catalog. You’ll also spot the new Around It All Dies, part of the exciting Online Exclusives releasing the same day, January 7. These products will be available in my online store, so mark your calendars!
FLORAL DELIGHT SUITE

AROUND IT ALL DIES


Crafting Tips for Success
- Cutting the Florals: While I fussy-cut the flowers directly from the Floral Delights Designer Paper, you could also stamp and die-cut them for a personalized look. Either option works beautifully!
- Layering the Circles: The Around It All Dies make layering effortless, giving your card depth and dimension without overwhelming the design.
- Adding Embellishments: Don’t be shy about using accents like the Tiny Bee Trinkets. Small details like these can elevate your card and make it truly memorable.

How to Mail Your Card
Wondering how to send this beauty to a loved one? The Circle Wreath Fold fits perfectly into a standard Stampin’ Up! Medium Envelope, as long as your floral elements aren’t too raised. For a coordinated touch, consider creating a custom envelope using matching designer paper. It’s a fun way to impress the recipient before they even open the card!

Free PDF & Video Tutorial
To make crafting this card even easier, I’ve prepared a step-by-step PDF tutorial that includes a complete supply list.
And if you’re a visual learner (and aren’t we all?), don’t miss the accompanying video tutorial from my previous Circle Wreath Class. Both resources are free and designed to guide you through the process with ease.

Ready to Create?
This project is perfect for card makers of all levels, and I can’t wait to see your creations! Be sure to tag me on Instagram @StampWithTami when you share your cards—I’d love to feature your work.
Don’t forget, the Floral Delights Suite and Around It All Dies launch January 7. You can find them in my online store along with all the supplies to recreate this card.
Happy crafting,
Tami


Really adorable card but when you go to download the PDF a different set of instructions shows up
Thank you! And thank you for letting me know the button had the wrong link. I’ve fixed it for you.
Gorgeous card, Tami. So beautiful and I love this fun fold. Enjoy your day!
Thank you so much for your generous shares!